Mama Hen Takes Her Chickies to Lake of the Ozarks.

Life isn’t only about chickens and gardening.

(although that would be pretty close to perfect!)

chickgarden

(A great book)

Once a year we have a family get together – it is this Mama Hen’s Christmas present to the family.

Life is hectic so we can’t always be together but once a year we cram fun and games and tons of LOVE into a looooooooooooooooong weekend.

This is only our third year doing this ( I hope we can continue for a long, long time), but it is our second year in beautiful Lake of the Ozarks.

loto1713

My daughter-in-law calls it the Midwest’s Paradise.

Since there are 16 of us we rented two three bedroom cabins side by side.  We can cook meals, hang out, enjoy the pool and deck and play games when we are not off doing some other fun stuff.


Here are some pics of my chicks!

005

vaca2014-24 vaca2014-17 vaca201436 vaca201434 vaca2014-21 vaca2014-12 vaca2014-5 vaca2014

No chicken keeping or gardening went on so there isn’t too much to write about.

I did get a great chicken-sitter to watch my ‘gals’ but that is for next week’s post.

I didn’t get many photos because we were busy eating, drinking, swimming, boating, tubing, fishing, shopping, go-karting playing games, going for ice cream – well you get the idea.

To me it is all about making memories and we made some good ones!

I hope you are having some summer fun and making some good memories with the people you love.

I am already looking forward to next year!017My flock. 

Compost!


Don’t be afraid of it.

Just because you are an urban farmer doesn’t mean you can’t have your very own compost, lots and lots of compost.

I LOVE composting because you get to make something useful and great for your garden from stuff that would go into the GARBAGE!

A win/win if you ask me!

Don’t let gardening articles with instructions about green:brown ratios, nitrogen, and other mind boggling facts requiring a PhD in Chemistry, intimidate you.

1blog

 Don’t let complicated tumblers, bins and other expensive items featured in catalogues, scare you away.compost2 compost1


 Are you worried you will have your yard taken over by mounds and mounds of smelly rotting matter?

compost pile

Do you think compost is a lot of work?

Well let me make it simple for you.

Here is how it works:

You put a bunch of  plant matter together, keep it moist and warm, and let the good bacteria do it’s thing.

That’s it.

You really can’t go wrong.

If you are an urban farmer like me you want your compost pile to be small and discreet, and it will work best if it is in some kind of container.  I use rubber storage totes.

compost4

 I have several left over from when we moved here 2 years ago.  I have my hubby drill several holes in the sides, a few inches from the bottom, for drainage.  I place the bins in an inconspicuous but handy spot in the yard. Mine are next to my doggie back door.  (I am lucky enough to have two back entrances to my house – I use one for the dogs to go out to their own little fenced in area.  It is one of the reasons I chose this house – HONEST!)

coop 007

I throw dried leaves in my bins each fall, filling each bin about 1/2 to 3/4 full.  I throw in used pine shavings from the coop.  Before I had the chickens I also threw in my weeds.  Now the chickens get my weeds, they eat them and give them back to me as poop!   Coop cleaning is so easy.  I put on my work gloves each morning and grab the poop pile made by each bird overnight while she roosted.  6 little poop piles sitting on top of the pine shavings bedding.

coop 003

 1 – 2 – 3 – 4 – 5 -6 – DONE!  I drop the poop and bedding handfuls in my metal bucket and deposit it into the compost bin.

I save coffee grounds, tea bags, veggie peels, and any other veggie/fruit scraps that do not go to the chickens such as citrus, potato peels apple cores, and so on.  I have a small metal trash can under my sink for convenience.  Some people keep a bowl or coffee can on the kitchen counter for these scraps.

compost5

Use whatever works for you.

Every day or so I dump these into my bin and give it a stir with a garden fork.   During hot days I sprinkle on enough water to keep it moist.  In the winter it freezes solid so I can’t stir it but I just add my scraps anyway and it gets cooking again as soon as the weather warms up.

Once a bin gets filled, you can start another. I have several cooking at one time. When the contents of a bin look brown and crumbly – in other words like compost – we’ve all seen it or seen pictures so I know you know what I mean, it is ready to throw on the garden.  compost6

How fast this happens depends on how warm the weather is, how small your food chunks are ( some people help by chopping or blending their kitchen scraps) and good old Mother Nature.

My method does not cause odor except when you lift the lid to stir but I actually like the smell and it does not travel far so your neighbors wont complain even if you place your bins close to your property line.

My dog Mick loves when I lift the lids, he tries to eat my compost! Maybe he thinks he’s a plant.

Here is a link to another great way to keep backyard compost under control:

http://www.hometalk.com/4029405/easy-diy-compost-solution-gardenfeature

So there you go.  Anyone can make compost.  Make as much or as little as you need.  You can do it even if you live in an apartment and only garden in containers.  Rubber storage bins come in 5, 10, 20 gallon and up sizes so there is a size to fit anyone’s needs.

Don’t overthink it – get out and get composting!


Front Yard Gardens

One of the reason I hate lawns is the amount of time, effort, money and resources that go into their upkeep.  Still, that alone would not bother me.  I mean if that’s your thing, go ahead, have at it.

Unfortunately, the upkeep of a beautiful lawn doesn’t end there.  A huge amount of fertilizer and weed killer chemicals,  as well as petroleum powered tools go into the care and feeding of a lawn.  That effects the environment and therefore ME!

That I do not like at all!

I love the current urban homesteading movement of forgoing lawns in favor of productive, environmentally friendly gardens.

That’s fine for the BACKyard you say but not for the front!   What would the neighbors say?

What indeed?

Here are a few pics of lovely FRONTyard gardens.

I applaud these people for NOT CARING WHAT THE NEIGHBORS THINK.

  fy2 fy6 fy5

front1

front2

front3

front4

In 2010 I put a front yard veggie garden in my Illinois yard.  It was necessary because I wanted to grow vegetables but our back yard was shaded by huge old oak trees.  I worried about what the neighbors would think but I did it anyway.

fy9

The neighbors loved it.

Some warned me that my tomatoes would be stolen.

That did not happen.

What did happen was that a local day care would walk the kids by every day to view the garden.  The teacher would explain the different plants to the children and they excitedly watched the progress of the growing things.  An old woman from the apartment complex near by told me with tears in her eyes of the garden she had once had in Russia.  Neighbors slowed down and waved or stopped to talk, share garden knowledge with me and offer me plants from their yards.  If there was anyone who did not approve I never knew.

It was a great garden and an enriching experience.   I am so glad I did it.

Here is the trailer for a book with tons of good info on getting rid of your lawn:

Do you or would you have a ‘front yard’ garden?

Urban Farm Update and Notes 2014

The lettuce is up and has been crazy!  I have all I want and then some.
It is delicious.

letuce

I just go out and snip, snip, snip and have fresh salad for lunch or dinner!

My radishes grew fantastically this year – I guess I will never know what the heck happened to them  last year but that is fine.  It is just one of those mysterious garden things I guess.

peas

My bush variety of Sugar Snap peas were tasty and prolific.   I wish I had planted another row or two.  I plan on replanting them in Sept. as a fall crop.  I have never done a fall planting before but want to give it a try this year.

My carrots are up with bushy green tops.  I planted a variety called Paris Market that has smaller round roots as opposed to the carrot shape we are all familiar with.    I pulled a couple today but they were only the size of marbles so I will give them more time.  I have never grown carrots before and they are another gardening mystery to me.

016

The 3 kinds of potatoes are growing like crazy.  Lazy – or as I like to call it – BUSY me did not ever get to piling up soil around the stems to encourage more roots and therefore more potatoes so we shall see how the harvest is.

If I were a pioneer wife and my family depended on me to feed them all year from the garden, they would STARVE!

My bush variety green beans are covered in flowers and I expect a great crop soon.

015

NOTE TO SELF and to other ‘mature’ gardeners:  Plant the climbing type vs the bush type of beans and peas and save your back a lot of soreness at harvest time!

back

I decided to let my chickens out one day to free range and they devored my cabbage plants.

The peppers are looking ok.  Not great but OK.  Well actually they are not looking so great and either is the eggplant.

All varieties of tomatoes are doing great.  I have green tomatoes on several plants already.

014

My husband says if all we get is tomatoes the garden is a SUCCESS!

I have some room in the garden where I never planted ANYTHING.  I don’t know if it was the weather or what but it took longer than ever to get out of my winter ‘funk’ this year.  I didn’t seem to have my usual enthusiasm.

I NEVER would have left unplanted space in my veggie plot!

I promise to do better next year – I PROMISE!

(Maybe I should start Zoloft next winter?????)

pills_happy

Or this:

antidepressant

Or better yet this:

bahamas-targeting

In the meantime the weeds are more than happy to fill in the unused space!

All the rain in Iowa has given me a bumper crop of  WEEDS!  The chickens love that I pull them and toss them in the pen.  It keeps them busy for hours scratching through them searching for their favorite bites and bugs!

chx

There ya go! I meant to leave those empty spaces for weeds to feed my chickens!  Of course, that has to be it!


Tell me about your garden.  Is it doing well this year?

  Does it get larger or smaller each year?

  Do you have any work-saving tips to share?


Last Years Garden – aka My First Garden Here

I thought I’d tell you about my current home and garden.

I don’t claim to be a ‘know-it-all’ about gardening.  That is not the reason I write this blog.  I write it because I love to write, I am a social person, I love to share and although I think I may have a few tidbits of knowledge to give, I also learn tons of stuff from networking and would love to connect with like minded people.

4600

We moved into our current house 2 years ago.  It is a ranch style built in the ’50’s, 1300 sq feet of pure efficiency.   I loved this house the minute I saw it.  We were coming from a 2000+ sq.ft. Victorian home in Illinois. standish In the ‘big house’ we mostly lived in one room, the ‘TV’ room as we called it.  We went upstairs to go to bed,  We cooked in the kitchen but ate in the TV room because the dining room was too formal.  We had a formal living room we only used for company.  It was a beautiful house but mostly unused.

Our current house has the tiniest kitchen ever built but it is all we need and perfect for us.  We have a large open living room with a casual dining area between it and the kitchen.  It also has an alcove that used to be a patio area which has been enclosed.  The alcove perfectly holds my entire formal dining room set. (I was sure I would have to get rid of that set when we moved here) Down a hallway are 3 bedrooms, not huge but big enough.  We say that we have all the room we need but not a square inch more!           1

Our lot is an average city lot.  We have neighbors on both sides.  One bit of luck is our backyard backs up to an empty treed lot so in the summer it feels like we have woods behind us.  The treed lot connects to another empty lot which connects to the back of a shopping area.  I can actually walk to the grocery store, my dentist and several other small shops by going a short distance from my back gate!  As you can see we really are very urban!

I did not want to till or do any backbreaking digging and I had been reading up on the benefits of ‘no til’ methods of gardening.  For more information google ‘lasagna gardening’

Here is one of the many great videos on YouTube on the subject:

.

I prepared my beds that first fall by raking all our leaves onto the 14 by 20 foot area I wanted to use for my vegetable garden.  Then in spring my hubby used some reclaimed wood and made a ‘border’ for my garden.  I didn’t want raised beds exactly but I wanted some definition or boundaries for the garden.

We planted lettuce, onions,  radishes and potatoes.  We bought several bags of topsoil, manure/humus and peat and I mixed equal parts of each in my wheelbarrow for what I call my ‘triple mixture.’  Sometimes I throw in compost or worm castings if I have some handy.  I used this to fill in my planting holes or to make shallow trenches depending on what was being planted.                 agarden1

Later that spring the bean, cucumber and squash seeds went in as well as tomato, pepper, cabbage and Brussels sprout transplants that I had started inside.  For my transplants I would dig a hole much wider and deeper than needed and fill with my triple mixture.  I mulched my plants with straw and also made paths out of straw.

Everythig did well except for the radishes which for some reason never got more than a spindly little root.  Perhaps my soil was missing some necessary nutrients?  I have never had any trouble with radishes before and I planted 3 different varieties and all failed.

If anyone has any idea what went on with my radishes please let me know! 

I will try them again this year.

I also did not call my potatoes a whopping success.  I have never planted them before and perhaps in my impatience I dug them up too soon.  I also will try them again this year.

We got tons of green beans, peppers, cucumbers, summer squash, lettuce, onions and herbs.

I believe that gardens get better over time,  so for a first year this was pretty darn good.

 How big is your garden?  Have you been gardening very long or are you new at it?


1tomatoes

New coop

The 3 new girls, Snowball, Pearl and Nugget are getting so big. It is time for them to go outside.

They need a coop and they need it fast!

 We need to get it built asap! I mean ASAP! This will not be my DREAM COOP. This will be my HURRY UP AND THROW SOMETHING TOGETHER COOP.

Sorry. I hope that doesn’t disappoint you. I’m not a carpenter by a long shot and neither is my spouse/helper. Plus I am a bit dyslexic which rules out trying to follow any plans. So I am ‘winging it’!

My original plan was to build the new coop out of pallets. Free pallets are always available on Craigslist. It would make me feel good because I would be recycling too. Everyone on Pinterest is always building something out of pallets.

Easy- peasey!         Right?

Ya sure.

Pinterest.

Where I got the idea for the adorable cookie cups that you can fill with pudding and fruit – the ones that turned into crumbs immediately after baking. Or like the 2 ingredient lemon bars that would be to die for. (Yuck) I could go on but I’m sure you get my drift. I am a Pinterest failure!

Ever try to bust down a pallet? Those suckers aint budging!

I have some scrap 2 by 4 ‘s in 4 ft. lengths that I will try to use, as well as some flat boards. Hopefully I can do a bit of recycling and keep costs down.

The saga of my new coop:

Day one:

I decided to build the new coop attached to the old coop, the Cluck Inn, sort of kitty corner – like a coop townhouse project. Whoops! Too hard, too many gaps, hard to get leveled. Decided to unattach it. I will just build a rectangle that will be part secure run and part coop. No problem! Let’s put it by the fence. OK no, too visible from the street, put it at an angle next to the Cluck Inn. Tried to use the 4 foot 2 by 4’s we had but it is a ton of trouble getting everything attached and square. Aaaaaaaaaarrrrrgggggghhhhh! (I told you I wasn’t a carpenter) I finally threw in the towel and went to the home improvement store where I spent 6 bucks for 2 8 foot 2 by 4’s.

Made a rectangle.

It looks good but it’s 45 degrees outside and I have to work at 3pm so I am calling it a day. I accomplished a 8 x 4 foot rectangle. Took 1 and a half hours.


Day two:

A trip to the home improvement store for lumber because there will be no breaking of pallets.  I have crossed that job off my list – FOREVER!   80 bucks later and a very squished ride home in the Durango we are ready to get to work.  There is frost on the ground (why do I live in the Midwest?) but work schedules and other commitments mean I have to get something done today.

Oh, and I changed my mind again and went back to putting it by the fence.  (did I mention that I have trouble making decisions?)

I decided to put the rectangle we made the other day, up on pressure treated 4 x 4’s.  My reasons for this are:

1.) Every few inches your coop is elevated saves wear and tear on your  back when cleaning it out.

2.) The wood around the perimeter helps protect the girls from winter winds and snow.

3.) Having the pressure treated wood against the ground will protect the structure from rot.

coop 001

So we made a second rectangle and attached the two rectangles together.  Next we put the vertical studs on.  I do know enough to use a level to  make sure they are straight.  We cut down 10 ft. 2×4’s and made the studs 5 ft. in the front and  4 ft. 8 inches in the back to allow the roof to have a bit of a slope so rain would run off toward the back. It is FREEZING outside so that is it for today.  Once my fingers thaw out I may get started on the nest box and doors which I can at least do in the garage.

coop 005

Day 3:

I work every third weekend and I work from 7 am til 7 pm which means I am pretty much gone.  Which also means my husband and son are left on their own.  Mostly they like to be couch potatoes and watch TV but I guess the allure of an unfinished coop was more than they could resist!

Now unlike us, my son can pretty much build, fix or dismantle anything.  He probably gave a little chuckle when he saw our 2 days of efforts.  OK, I’m being nice, he most likely laughed out loud.  When he’d finished laughing and wiping tears from his eyes he took his truck to the lumber store, came back and built the coop to end all coops.  Or at least the bare bones of one.  Being a male, he figured BIGGER is better so my new coop is 7 and a half feet tall.  It has  three stories!  It will survive a Cat. 5 tornado.  I love my coop, what a sweet surprise!

new coup 001

Right now it is a big sturdy rectangle.  It is up to me to decide where to put the hardware cloth, where to put the roosts, nest boxes, doors, walls, and windows. What kind of roof?  Should it overhang? Do we want a porch?  How should I landscape it? What type of siding?  Paint it or let it age naturally?  Endless possibilities! (And blogging opportunities!)

Please comment with your suggestions!  I’m also trying to think of a name for my new and improved coop, just in case you are feeling creative!

What Came First? The Chicken Or The Coop?

In our case it was the chickens.  We got our cute, fluffy, adorable and irresistible chicks and then had to figure out what to do with them.  This may not be the recommended way to do it but then I have always been impulsive.  Opposites attract so my husband is rational and practical and balances me out, right?

Ummm hmmm.

                                                              So our cute day old chicks got housed in a super large storage tote with a heat lamp providing warmth while we perused coop plans,2013a

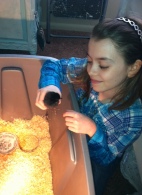
Damn those plans looked confusing.

What to do?

  What any self-respecting city farmer with no carpentry skills would do – look on Amazon.

We found a cute coop kit (unfortunately they come in kits so you have to do some assembly) and the ad said it would house 4-6 hens.  We ordered it and it arrived in two boxes with instructions that consisted of a series of drawings, no words.

coopparts

Ummmm hmmmm.

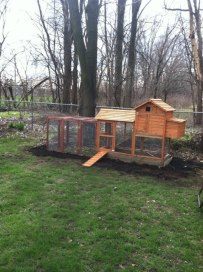
We actually got it put together without any injury or tearing out of hair.  It was so adorable!  We just loved our adorable little coop. unfinished coop

We moved it to a spot in the yard and then moved it to another spot and finally to its final spot.  Because our yard is half sun and half shade, and the sunny part is taken up by my gardens, we placed the coop under some mature shade tress in the back of our yard.  I am so glad we did!   Our girls had a much more enjoyable time during last summer’s heat wave.  Their area was the coolest spot in the yard and they loved the leafy shade.  If you are getting chickens and you live where summers are hot – please put your coop in the shade!

When choosing a spot for your coop besides putting it where there is summer shade, also try if possible to place near some evergreens for a winter wind break.  You will want it close enough to your house to make egg gathering, cleaning and tending to the flock convenient in all weather.  In our city there is a restriction that it has to be 25 feet from the neighbors dwelling.  Be sure to check the rules in your area.

  Finally, when keeping an urban flock, especially if your yard is visible to neighbors, you will want to place your coop in a considerate manner.  Try to keep it attractive, clean and  ADORABLE!

shedcoop

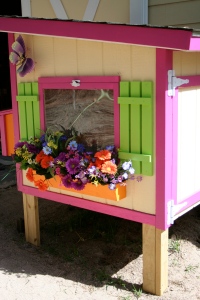
I had visions of a cute, shabby chic, cottage style coop with flower boxes and landscaped loveliness.

First things first though.

.  When using a store-bought coop from a kit there are some modifications I recommend.  First of all, the run area of our coop seemed much too small for 4 hens that we were not sure would be doing any free ranging.  We chose to order another pre-made add-on run but I now realize that building one would not be that challenging.

coopunpainted

  Either way, provide your flock with a secure run, as large as space and resources  allow.  We also elevated the coop on 4 by 4’s and put a ‘skirt’ of chicken wire all around which we secured to the ground with landscaping stakes before covering with soil.  Since we inherited a lot of patio pavers when we bought this house, we laid these around the perimeter as an added protection against digging predators.  We secured any gaps and openings with wood and changed out our hardware for sturdier.  Because we elevated the coop, the original ladder to the sleeping area was now too short so we made a new, longer one.  We  changed out the original roosting bar for a wider one after reading that it would keep the girls’ feet warmer in the winter.  We also raised it a bit and moved it a bit farther from the nest boxes.  (no one wants poop in the nest boxes).  Maybe it’s beginners’ luck but so far our chickens have been healthy, happy and safe.

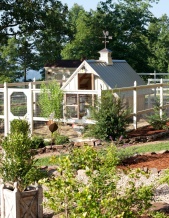
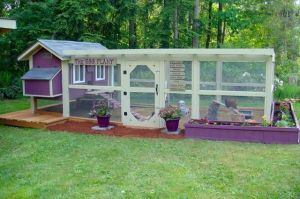
I caulked all the seams, then painted the coop white with a turquoise roof and named it ‘The Cluck Inn’ which I stenciled on.  I thought a picket fence would be cute so I found some small white fencing at WalMart and hubby helped me screw it all around the run.

006002

I love my little Cluck Inn!

The chickens loved it too, we moved them out there when they were about 10 weeks old.  They were happy and healthy chickens, right at home and ready to grow and mature and start giving us eggs.

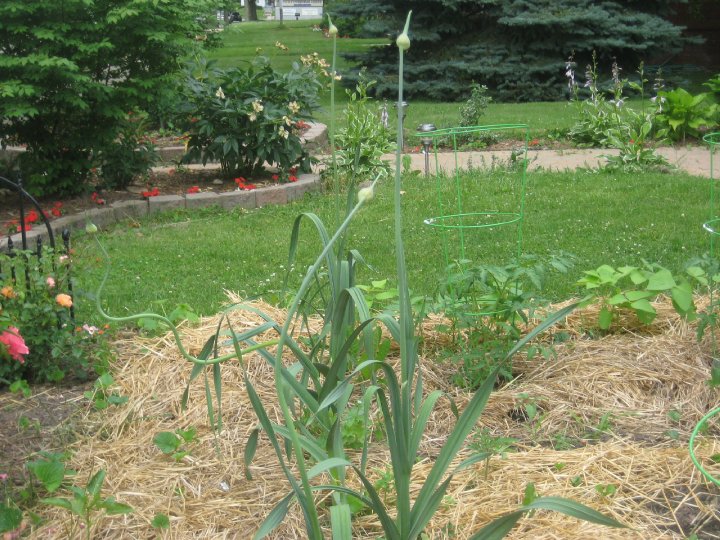
I landscaped with stepping-stones, shrubs and flowers and we would sit in lawn chairs and watch our chickens being happy.

2013j

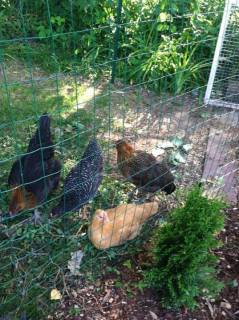
Then I began to worry.  Their run did not seem like enough room for chickens that may not be doing any free ranging.  A gal from our Backyard Chicken Club showed me a picture of a pen she built for her chickens out of landscaping stakes and green wire fencing.  Easy-peasy and almost invisible.

chickensinrun

Perfect!

 They loved the fresh green grass of the pen and in a week all the grass was gone.

  Chicken landscaping!

That’s ok though because all spring and summer when I weed my garden I toss the weeds into their pen for them to scratch around and nibble.  I may start asking neighbors for their weeds!  (as long as they don’t say ‘you pick ’em!’)

I plan to put shrubs, ornamental grass, large planters or SOMETHING around the pen so it wont be an eyesore for the neighbors (honestly I do) – something rural farmers don’t have to worry about.

  Each morning we let them out into the daytime pen, and each evening when the sun goes down they go inside the coop to roost and we secure the coop door.  If we sleep in or are not around in the morning to let them into the pen, or if the weather is cold or rainy and they just don’t feel like going out, they still have the secure run to keep them from being ‘cooped up’ (sorry, couldn’t resist).

Later last summer hubby built a roof over the ‘add-on’ run to keep it dry when it rains or snows.

Chickoncoop

(Ummmmmmm………Martha……..you have to be IN the run to benefit from the roof!)

Last fall when the garden was harvested I got brave enough to let them free range in the yard part of the day when I am around to check on them. They love it and it is becoming a permanent habit although I need to find a way to protect my tender flower sprouts and vegetable garden this spring.

So……………. coop……………… run…………….daytime pen…………. occasional free ranging……………..everything is complete now,  right?

Wrong!

It will NEVER  be finished!

After just one year I have a huge list of things I want on my next coop – the new and improved Cluck Inn.  I have pinned zillions of  coops on Pinterest.  I am collecting pallets and lumber. This time around no store bought coop – I am confident that we can build it!

 I even dream about coops!

coop4

coopdream

coop6coop5

From experience I now know that I want a ‘person’ sized door for easier cleaning.  Of course I need a larger coop so I can have more chickens (there’s that chicken math kicking in again).  I want a taller secure run and a more secure and attractive daytime pen.  I want a pitched roof and a gutter/rain barrel system.  I want landscaping so it is attractive in all seasons.

And yes, I still want those darn flower boxes.

coopflwrbox


Next Newer Entries

slcriger

Smile! You’re at the best WordPress.com site ever

Make Me Some Soap...

A blog for folks who love using and making handmade soap

On The Upside

Saddle up! Let's take a ride...

Gumboots and Grammar

My passion is my strength

Restorable Living

The art of reclaiming daily life.

Sunny Sleevez

Sun Protection & Green Info

No Milk Today

Allergy or Food Intolerance: Delicious Dairy-Free Recipes, DIY & more :)

THE UNFETTERED FOX

Curious facts and cautionary tales ~ adventures in rural living

The house by the sea foodwaves

RECIPES & FOOD THOUGHTS

SunshineHelpMeGrow

A stereotypical college student just trying to get by...

rachelmankowitz

The Cricket Pages

Goldenrod Homestead

Permaculture and Market Gardening

Back Porch Sheep

My sheep listen to my voice; I know them, and they follow me. John 10:27

Butterfly Garden

Attracting & sustaining butterflies and growing native flowers.

A Note From Abroad

“Twenty years from now you will be more disappointed by the things that you didn’t do than by the ones you did do. So throw off the bowlines. Sailaway from the safe harbor. Catch the trade winds in your sails. Explore. Dream. Discover.” ~ Mark Twain

GARDEN OF EADY

Bring new life to your garden!

Crazy Green Thumbs

Chronicling a delusional gardening experience.

down to earth digs

life in and around the garden

Life on the Farmlet

My continuing adventures in North Alabama!

My Food And Flowers

Two of the Great Joys in Life!

Urban Overalls

Celebrating the urban homestead